

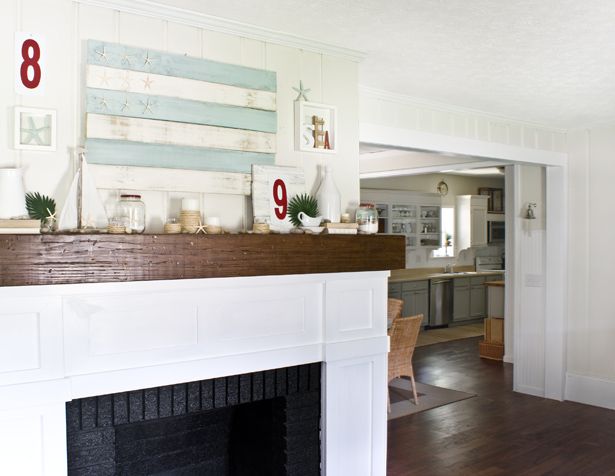
I always love a project that combines the use of loads of tools with math. Yep, I'm a geek...I do math for a living and I'm the daughter of an engineer. Need I say more?! So when I realized that I could use pallet wood or fence boards to make my own DIY American flag for the 4th of July, I knew that I had to do it! It all started with THIS adorable mantel. Note the cute "beachy" flag?!
The original post, by Kevin and Layla at The Lettered Cottage is from 2009. Of course, it looks familiar, it's all over Pinterest.
Then I saw the cute flag wall decor from Pottery Barn.
What's a girl to do? I don't want to have to choose just one! So I did what any girl with her own power tools and a week of vacation would do, I made both. I took a quick trip to The Home Depot to purchase ten, four foot cedar fence boards ($1.08 each). These are the same boards that I used for the nursery signs that I made a few days ago.
Then, on Monday morning, I bought these:

I assembled two flags using the same basic design and five boards each. I cut the "fence top" ends off of the boards, ripped them in half lengthwise,and ripped one of the half-sections in half again (stay with me here, that's a board that's 4 feet long and 1/4 the width of the original board). Then, I cut that board in half lengthwise (this yields 2 pieces, 23 1/2 inches long which I used to make the bracing strips that go on the back to hold it together). I screwed the flags together with 1 1/4 inch screws, being careful to make sure that they wouldn't go all the way through the front.


After realizing that I had 1 1/2 and 2 inch blue tape and neither of them would work, I went to the hardware store to buy Frog Tape which is exactly .90 inches wide. I used two pieces side-by-side and it worked perfectly. Next came the paint. I used an old trick that I learned in art school: I applied several different colors of red using a plastic spatula. This gave the piece an aged look even before I sanded it.


The piece was sanded and glazed. Then, I added a little Serendipity


Next, I moved on to the "beachy" flag. I used the same basic design but this time, I did
fewer, wider, stripes and made them a single color (ASCP Old White
mixed 1:2 with Duck Egg). The star ground was two shades of blue, put on with a
spatula.


S
Resource list:
Lumber and hemp rope: Home Depot
Paint: Annie Sloan Olde White (for all of the white) and Duck Egg for the beachy stripes
Various shades of acrylic craft paint for the remainder of the painting
Starfish: Ebay
Star stencil: left from a project that I did when my now 17 year old son was two years old and going through his "spaceman" phase. Yeah, I actually hung onto it for that long...and managed to find it!
Linking to:
AKA Design
Beyond the Picket Fence
Coastal Charm
Common Ground
Craftomaniac
Craftionary
Embracing Change
Family and Home Life
Home Stories A to Z
House of Hepworth
Itsy Bitsy Paper
Not Just A Housewife
Shades of Amber
Stone Gable
Stuff and Nonsense
Tatertots and Jello
The Shabby Creek Cottage
The Vintage Farmhouse
Tip Junkie
You're Talking Too Much
Featured:

Stone Gable
Stuff and Nonsense
Tatertots and Jello
The Shabby Creek Cottage
The Vintage Farmhouse
Tip Junkie
You're Talking Too Much
Featured:
