

Showing posts with label Flag. Show all posts
Showing posts with label Flag. Show all posts
Farmhouse 4th of July Foyer Decorating


Vintage 4th of July: Red White and Blue Table Decor

Today, I finally got a couple of bins of 4th of July decorations out of the attic and decided to put a few vintage red white and blue things on the kitchen table. I really didn't plan on doing too much decorating this year.
Getting Ready for the 4th - Scenes from my Home and Gardens

We're getting ready to Celebrate America's Birthday in our home. My vintage milk bottle carrier is at the ready. The empty spots in the holder will be filled with condiments on the big day and daisies from my garden will be added to the flags.

The ledge on the hood above the cook top gets treated to a little "Americana" with an old porch newel that has been drilled and filled with American flags. And who can forget my crazy American Flag Party Pick Wreath? I know that I'll be shaking my head about that one for a long time!

When I made the patio cushion covers in May, I purposefully made one side solid white. This enables me to change the look for special occasions like this.

The 4th of July has always been cause for celebration in our family. The tradition was established by my parents and their life-long friends before I was born. I grew up having a party to celebrate the 4th and it's a tradition that became one of my own when I had my sons.

On some July 4th's, the party has been an all day event that starts with Red, White and Blue breakfast and a trip to the parade and ends at 11 p.m. with fireworks. Other years, it's been a simple cook out with family and friends. One thing that's always consistent, however, is that we always celebrate!

There's not a doubt in any one's mind that I love the 4th of July. At least I don't think there is...you can tell, right?

Here's the vignette that I created in our foyer using one of my favorite ironstone pitchers and some vintage books about flags. Of course, my beachy starfish are also a part of the display. I think that they fit right in!

I found this cute pillow cover at Pottery Barn and added it to a "not too red, white, and blue" vintage quilt.

My favorite vignette is on the yardstick-covered chicken carrier that acts as a coffee table in our family room. It's a simple nod to the Great American Past time ...
...and to the fact that I live in a house full of men!

Of course, then there's the outside decor....


The gardens are putting on a show of their own this year! Daisies and larkspur are waiting to be picked!


Hydrangea, day lilies, monarda...the whole garden is ready for the party!


The decorating will be wrapped up today. Then it's on to menu planning, shopping, cooking and baking. Just as soon as July 1 rolls around and end of quarter/end of half at work is behind me because by then, I'll be more than ready for some celebratory time with family and friends!

How do you celebrate?
xo,

Linking to:
Common Ground
Home Stories A to Z
Not Just A Housewife
Pallet Wood Fence Board American Flag DIY

I always love a project that combines the use of loads of tools with math. Yep, I'm a geek...I do math for a living and I'm the daughter of an engineer. Need I say more?! So when I realized that I could use pallet wood or fence boards to make my own DIY American flag for the 4th of July, I knew that I had to do it! It all started with THIS adorable mantel. Note the cute "beachy" flag?!
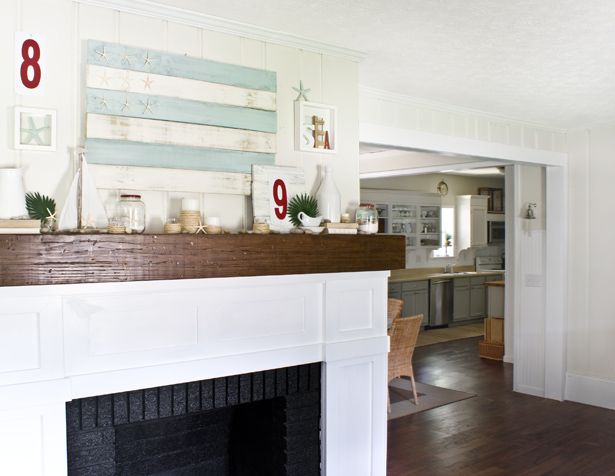
The original post, by Kevin and Layla at The Lettered Cottage is from 2009. Of course, it looks familiar, it's all over Pinterest.
Then I saw the cute flag wall decor from Pottery Barn.
What's a girl to do? I don't want to have to choose just one! So I did what any girl with her own power tools and a week of vacation would do, I made both. I took a quick trip to The Home Depot to purchase ten, four foot cedar fence boards ($1.08 each). These are the same boards that I used for the nursery signs that I made a few days ago.
Then, on Monday morning, I bought these:

I assembled two flags using the same basic design and five boards each. I cut the "fence top" ends off of the boards, ripped them in half lengthwise,and ripped one of the half-sections in half again (stay with me here, that's a board that's 4 feet long and 1/4 the width of the original board). Then, I cut that board in half lengthwise (this yields 2 pieces, 23 1/2 inches long which I used to make the bracing strips that go on the back to hold it together). I screwed the flags together with 1 1/4 inch screws, being careful to make sure that they wouldn't go all the way through the front.


After realizing that I had 1 1/2 and 2 inch blue tape and neither of them would work, I went to the hardware store to buy Frog Tape which is exactly .90 inches wide. I used two pieces side-by-side and it worked perfectly. Next came the paint. I used an old trick that I learned in art school: I applied several different colors of red using a plastic spatula. This gave the piece an aged look even before I sanded it.


The piece was sanded and glazed. Then, I added a little Serendipity


Next, I moved on to the "beachy" flag. I used the same basic design but this time, I did
fewer, wider, stripes and made them a single color (ASCP Old White
mixed 1:2 with Duck Egg). The star ground was two shades of blue, put on with a
spatula.


S
Resource list:
Lumber and hemp rope: Home Depot
Paint: Annie Sloan Olde White (for all of the white) and Duck Egg for the beachy stripes
Various shades of acrylic craft paint for the remainder of the painting
Starfish: Ebay
Star stencil: left from a project that I did when my now 17 year old son was two years old and going through his "spaceman" phase. Yeah, I actually hung onto it for that long...and managed to find it!
Linking to:
AKA Design
Beyond the Picket Fence
Coastal Charm
Common Ground
Craftomaniac
Craftionary
Embracing Change
Family and Home Life
Home Stories A to Z
House of Hepworth
Itsy Bitsy Paper
Not Just A Housewife
Shades of Amber
Stone Gable
Stuff and Nonsense
Tatertots and Jello
The Shabby Creek Cottage
The Vintage Farmhouse
Tip Junkie
You're Talking Too Much
Featured:

Stone Gable
Stuff and Nonsense
Tatertots and Jello
The Shabby Creek Cottage
The Vintage Farmhouse
Tip Junkie
You're Talking Too Much
Featured:

The Flag Party Pick Wreath - When Willpower Overcomes Common Sense

Ever have one of those days where you start one project and end up doing something completely different? I had one of those last week. I went to the pantry to find tea lights for the Patio Lantern Project. When I tried to open the drawer, it got caught on boxes of flag picks which have been left over from several years of 4th of July parties at our house. Then, I remembered pinning this to my Wreath Board on Pinterest.

So, rather than getting the tea lights, I immediately went to my studio and grabbed a wreath form. After all, I had 600 flags, that should be enough, right? See the wreath on the table below? Apparently not.


I went to JoAnn fabric. They had no flags. I went to Michaels. They didn't have a single one either. Then, earlier this week, I was at Hobby Lobby and I found them! I bought an additional 600 flags and brought them home. I was so excited to finish this project and get it off of the kitchen counter! Right after I finished printing the napkins that I was making. After all, that's why I went to HobLob in the first place! Last night, I finally poured the flags out onto the counter and guess what?


See how much better they look with the three sizes "artfully mixed together"?! Um...yeah....me either.

I painted some stars. I hung the wreath on the door. I stood back.

Notice the "white rows" where you can see the form? Yep, me too.

So, I did what any


Whew! That's better.

I've made my peace with the bits of the white form that still show through here and there. Although, in the spirit of "full disclosure", I'll admit that I DID, for ONE SECOND, consider taking it apart and wrapping the form with ribbon.
Moving on now.
xo,
S
Linking to:
Nellie Bellie
The Crafty Blog Stalker
House of Hepworth
Subscribe to:
Posts (Atom)