Showing posts with label Burlap. Show all posts

Quick Easy DIY Spring Easter Wreath

Pin It


Honestly, I wasn't even going to write a post about this spring wreath. It's so easy that it literally took about ten minutes and cost $9 using three bunches of faux carrots that I got at the craft store, a grapevine wreath, a couple of strips of burlap and a piece of ribbon  that I found in the mess in my studio had on hand.
It's the very best kind of project. one that requires no tools other than scissors.  Here are the "directions" (and I use that term very loosely because if you're looking at it, you can pretty much tell what I did).

Place the grapevine wreath on the table.Take apart the bunches of carrots, cut strips of burlap 1 to 1/12 inches wide. Use the threads from the burlap to tie the carrots to the wreath (If you prefer, you can hot glue the carrots to the wreath but I like to reuse things and these will probably end up somewhere else in my spring decor next year if I can find them.

Cut the burlap strips into 8 inch (approximate) pieces. Tuck the pieces of burlap through the wreath and tie with a single loop. Make a bow out of a 1 1/2 inch to 2 inch wide strip of burlap. Thumbtack orange ribbon to the top of the door, tie the wreath onto the door using the ribbon.

Put on your coat, and your boots, and your hat, and your gloves...and a scarf.  Go outside. Stand back. admire your wreath. Take photos. Explain to the mailman why you're standing outside in the cold taking photos of your wreath. Wonder why you still live in a place where it still snows in March and April and sometimes, May.
Decide that it's too cold to stand outside pondering things that you can't control. Go inside and have another cup of coffee, tea, cocoa (since it's too early for wine).

That's it. Super simple, quick, easy, Spring Easter wreath. It's a little bit rustic...and a little bit garden..and a whole lot of inexpensive. (I thought about using the word cheap...but then it should probably have had chicks on it...you see what I did there, right?!)

Thanks so much for reading!

Kimberly

Rustic Natural Fall Grapevine Wreath: Mushrooms, Pinecones and Moss

Pin It

Since it is officially "Autumn" and I've finally located the boxes with the decorating supplies in the attic, this week I  made time to do a little Fall decorating.

Flowers for an Autumn Wedding: Pinecones, Roses, Burlap and Cotton

Pin It

Every now and then, I'm invited to be a part of something magical. This week is one of those amazing times. Sometimes the magic involves pine cones, roses, raw cotton, and burlap. Other times, it involves the phone company.

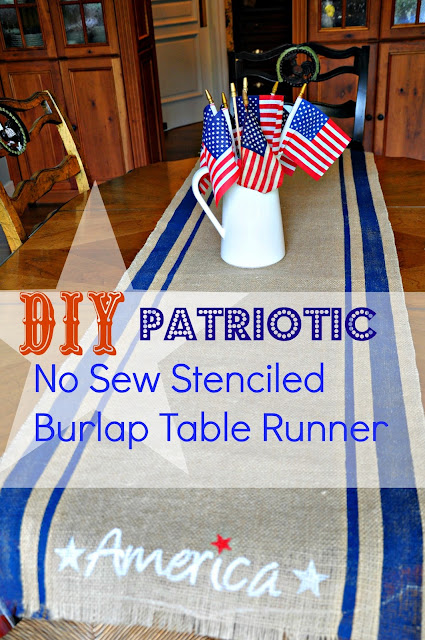
EASY DIY: Patriotic "No Sew" Stenciled Burlap Table Runner With Grain Sack Stripes

Pin It
Quick Easy DIY 4th of July Patriotic No Sew Grain sack Stripe Stenciled Burlap Table Runner by Serendipity Refined

I'm so glad that you stopped by today! Happy "almost" July 4th! First, let me say that I can't believe that it's JULY already, can you!?  Today, I'm sharing a quick and easy DIY project: A Patriotic, no sew, stenciled burlap table runner with grain sack stripes.  It's my favorite kind of project...the one that's free...and can be done in under an hour!

Wonderful Saturday Wedding Details: Florals, Lanterns, Burlap and Mason Jars

Pin It


As I know I've probably mentioned several times, I have a dear friend named Sadie who is an incredibly  talented florist and who owns The English Garden Flower Shop in Clarendon Hills.

Burlap Easter Napkin Rings {Pier 1 Knockoff} Bunny Ears and Butterflies

Pin It


I realize, of course, that this is a little "last minute" but these napkin rings are super simple and you can make a dozen or so in under an hour...honest.

Stenciled Burlap Bunny Table Runner {No Sew}

Pin It

I may need to join  B.A. "Bunnies Anonymous". I think that I've got a problem. I've fallen in love with yellow...and bunnies...and I can't seem to stop! Trust me when I tell you that right now, in our home, they're everywhere!!!


I was in Hobby Lobby for the third time this week yesterday to pick up a few cardboard eggs to finish a project in the dining room.  I have no idea how or why I ended up in the fabric department.

                                                                                                             Does that ever happen to you?

I remember walking through the doors and the next half hour is pretty much a blur...


The next thing I knew, I was standing at the cutting table, holding the prettiest yellow burlap that I've ever seen...

Well, to be completely honest, it's the only yellow burlap that I've ever seen but that's not the point.  As soon as I saw it, I knew what I had to do.  White pom pom trim, some giant white rickrack and white craft paint...the answer seemed so obvious...


One bunny drawing (and a quick trip to the copy center to have it laminated) later,  I was set.  The runner is simply cut from burlap. All four edges are frayed.  The pom pom trim and rick rack are glued on with fabric glue.   Before you ask...yes, I did cover the table with plastic before I stenciled and glued

                                                                                                  ...well...right after the first word, anyway!


The words were stenciled using 2" letters.  The bunnies are from a quick drawing that I had laminated cut out with an Exacto knife and used as a stencil.


The tails pom poms that were trimmed until they are nearly flat.


Over the course of the next two weeks, I'll share the rest of the Easter decorating that's going on in my kitchen and family room and my admitted obsession will become more obvious.


For now, let's just pretend that I have a cute, yellow burlap, stenciled, bunny, table runner on my kitchen table and leave it at that.


I'll be sharing the rest of this tablescape as well as my family room decor,  this week so stay tuned!

xo,
Kimberly
Sharing at:

DIY Showoff
Eclectically Vintage
House on the Way
I Gotta Try That

Moss and Burlap Spring Banner {Tutorial}

Pin It

Sometime back in late January, right after I finally finished cleaning up the last of the glitter from the DIY Pottery Barn knock off glitter Santa that I made for my sister for Christmas, I was feeling brave one afternoon and I decided that I was going to use moss in my spring decorating this year.

Burlap Wrapped Chandelier Mini-Tutorial

Pin It

When I casually mentioned that I was considering spray painting the 9 year old, solid brass, chandelier that hangs in my dining room, let's just say that the idea "wasn't well received". The fixture is huge, heavy and, unfortunately, in beautiful shape. I chose it. But that was almost ten years ago, back when I thought that I could be "formal" (insert the sound of people laughing and rolling around on the floor, here).

Several of  you have asked for details about the chandelier makeover that was featured in my dining room reveal.  I didn't take photos as I did it. At the time, I was too busy burning my arms and hands because I tried to wrap it with the lights turned on.  Yeah, I know, don't say it.  So, if after the confessions above,  you still want to try to wrap your chandelier (without needing burn cream),  here's how I did it.

Materials to wrap one huge chandelier: 

  • 2 spools of  Burlap Ribbon ($4.99 or so from Michaels in the aisle where they keep the wire wreath forms)
  • 2 spools of wire and vine "ribbon". (I found it in a bin near where they keep the moss, it comes in two sizes. I don't remember the price but I don't think that it's more than $6 or $7 a roll). 
  • Wire Cutters.
  • Pencil sized pieces of twigs that you pick up from your yard after it rains for the fourth day in a row.
  • Straight pins
  • 4-6 inch grapevine wreaths (Michaels $0.49 each)
  • Leftover moss from some project  that you probably did in 2008
  • Enough common sense to turn the light OFF before starting.
 DISCLAIMER: Some of these photos were taken tonight when I remembered that I promised this post, they're a little dark and a little yellow. Sorry about that.
To make the cages:

  • Unroll and cut a 10 inch (give or take) piece of  the "vine ribbon". Weave a stick through one end and form into a circle. Twist the wire from where you cut the other end around the stick (the first one off of the roll will have the stick on it because that's how the roll comes).  Don't worry if they aren't perfect. "Rustic" is seldom perfect. 
To wrap the Chandelier:

  • Start by pulling a thread from the center of one end of the burlap ribbon. This will cause it to "ruffle".  Make enough ruffled burlap to go around the ceiling plate a couple of times. Fasten it by sticking a straight pin through the ruffle and sliding the point of the pin between the ceiling plate and the ceiling. Be careful. I happen to know that the wires in my chandelier were capped and taped so I felt okay about doing this. If you're uncertain, thumbtack it to the ceiling then fluff the ruffle to cover the tack.


  • Using the straight burlap, wrap the chain and the main body of the lamp until you get to the bottom  (or any other part of the body that you want to "feature"), when you get to a "feature", simply pull the thread, make more ruffle and use the ruffle to wrap that section.  I made a ruffle part to cover the cap where the chandelier meets the chain and the bottom "ball" of the main fixture. For the bottom ball, I simply made a long strip of ruffleed burlap and wrapped it around the ball several times weaving it up and  then down between the arms fpr one row and then down followed by up in the next row (like figure 8's). At the bottom, you may need a couple of straight pins to hold it in place then, cut it off, tuck the end up inside of the ruffle around it, pin it and you're finished!


To finish the candles:

  • Add moss around the candle base, top with a grape vine wreath and slide the cage over the candle. 
That's it. I made over a huge chandelier for under $35. It's not permanent and no one had to wonder if I had finally gone over the edge...at least no more than usual.  
If you still have questions about it, send me a message.

xo,

S

Linking to:
Freckled Laundry
Chic on a Shoestring
The Shabby Nest
Strut Your Stuff Saturday - Six Sisters
AKA Design 

Featured at:

Dining Room Make Over Reveal

Pin It
BEFORE
We've lived in our home for ten years. When we built it, it was decorated in a very traditional, very formal, style. As my style has evolved and I've expanded my various collections, I decided that I wanted a more casual, more "farm girl french", style. I wasn't sure how I was going to accomplish this with just paint and a few accessories, but this is where I ended up.  They say that "a picture is worth a thousand words." With that said, I'll let the photos do the "talking". 

AFTER

Vintage Market Recap - WARNING: HEAVY PHOTO CONTENT

Pin It

This weekend, I was blessed to be a part of a wonderful, Vintage Market at the home of my dear friends, Polly and Steve from Counting Your Blessings. These gracious hosts not only cleared the first floor of their historic farmhouse for this event, they also assembled a group of incredibly talented, smart, funny and crazy-talented vendors in which I was humbled to be included. 

My "Home for the Holidays"

Pin It


With only hours remaining until Christmas Eve, I thought that I'd share the final photos of my house for this year and a poem from Helen Steiner Rice. I wish each of you the magic and wonder of the season, the love of family and friends and above all, I wish you "enough". Enough time, and patience; love, and faith. Enough kindness and compassion for yourself and others.  Enough togetherness and alone time. Enough resources.  Merry Christmas.

A Season of Kindness
May the kindly spirit of Christmas spread its radiance far and wide
So all the world may feel the glow of this holy Christmastide.
Then may every heart and home continue through the year
To feel the warmth and wonder of this season of good cheer.
And may it bring us closer to God and to each other
'Til every stranger is a friend and every man a brother.


More holidays!

Pin It
The holiday decorating continues!

Dining room side Board. re-purposing pine cones from Thanksgiving and burlap from exterior Autumn wreaths.

My sons' "sleigh", the birch logs from Thanksgiving.  Vintage Santa, skates and lantern - in the corner of the dining room.
Silver punch bowl with pine cone wreath and pine cones
Thanksgiving centerpiece "reworked" for Christmas using mixed Christmas greens, red berries (fake), pine cones, vintage red lantern, cardinals and a plaid bow.


Kitchen table - I made the black and white table cloth out of flannel, edged in red. Good Will Candlestick holders, vintage boot with pine cones, a "vintage" glitter snowflake and faux greens.
 I'll post more tomorrow.

Good night!

xo,

S

Christmas in My Kitchen - 2011

Pin It
I thought that I'd share a few shots of this year's Christmas decorations in my kitchen...

of course, I'm not finished...


Behind the scenes - Thanksgiving Tablescape.

Pin It
As promised, here are the details of the table scape posted yesterday:


Table Cloth: two 9x12 PAINTER's DROP CLOTHS (yep, that's right, folded them in half, put them on the table) - they came from our local paint store and cost $9 each.

Table Runner: Men's suiting fabric, hounds tooth wool. Closeout at Joann's $3.99 used my Merry Moolah coupon for $5 off my purchase of $25.00 so the table runner and a ball of jute were FREE
Had enough left over to make a runner for the sideboard and wrap 14 votive cups for individual centerpieces at each place.


Wood Chargers: These were a challenge at first but I found out that anyone with a steady hand and a chainsaw can make them.  Traci at Whimsy in Morris has a guy who will do it. I found a really nice man named Tim who owns a mill in Yorkville that will do it and I found out that I can actually do it as well. 

Vintage Brown and White Transfer ware Dinner Plates: Borrowed from my friend, Ann at Nellie's. They were PERFECT...and although priceless, they were FREE to borrow.

Small Bread Plates: Purchased at the Goodwill on a Tuesday during customer appreciation and got a 20% off scratch off. They cost 35 cents each. Total $4.90

Candlesticks, teapot, candles, silverware, glassware, votive holders, napkins:  From my collection.

Centerpiece: Old, wooden shipping crate gifted to me by the same friend (Ann) who loaned me the dishes.  She waxed it brown, I added 4 men's belts from Goodwill ($0.99 each), dried hydrangea and dried flowers from my yard, a couple of nests that I had on hand, some lotus pods, pine cones and dried artichokes (also on hand)  I purchased greens, tallow berries, 3 "quails" and 5 magnificent turquoise hydrangea. Total investment for an incredible centerpiece that I'm going to redo slightly for Christmas as well as the 14 individual place setting pieces: about $40.
Jute Tied Napkins with Leaves:  Punched out the leaves at Archivers. Bought 3 sheets of card stock, used their die cut machine at no charge: Cost $1.50.

Total investment? $68.50 and while that is a significant amount of money, the dropcloths, plates and table runner are all reusable and I was able to set a table that made an impression that will last a lifetime for my family and friends. 

I spent today cutting down the last of the garden and raking the last of the leaves (16 barrels and bags full...it took me all day!) Tomorrow, I'm planting tulips for next spring. Then, it's on to Christmas Decorating!

P.S. Yes, we removed the centerpiece during dinner. It's probably taller than the "ideal" would be but it is PERFECT for me!

Have a wonderful weekend.

xo,

S

Giving Thanks

Pin It

It starts when we're young.  Older adults shape our lives. They teach us about love...and gratitude. In some of my very earliest memories, I was taught to say "please" and "thank-you". It's a basic concept for most of us.  Human decency, kindness, thoughtfulness. I like to think that I do a pretty good job, most of the time, remembering, to express my thanks.

It's beginning to look alot like HOLIDAYS!!!!!!

Pin It
Sorry I've been "absent". I've been in "full on decorating" mode and have to work through end of day Wednesday this week. 

I'm picking up the wood "cookies" (slices of tree trunk to be used for chargers on my Thanksgiving table) today so I should have photos of the table to share tomorrow. If not, I'm in serious trouble because Thanksgiving is 48 hours away. In the meantime, here are pix of my family room mantel and the materials and first part of the staircase.


Base lighted garland from Costco 10 years ago. Hhomemade pine cone wreath, reused burlap bows from front door autumn wreaths. Black Metal lanterns close-out from TJ Maxx 8 years ago. Added "frosted garland.
Same base, Costco garland as is in the family room (10 years old, still works!). Added a few larger pine cones: some painted and some "flocked".

Plaid ribbon 50% off at Joann's. Styrofoam balls wrapped with men's plaid shirts (Salvation Army/Goodwill) or fabric. Dollar Store bells. burlap, plastic ornaments 90% off at Kmart last year, Red "velvet" ribbon (you can find it at Hobby Lobby or Joann's but mine came from a hardware store called Wannemakers).


Happy Tuesday!

xo,

S